September 23, 2014 – Area Quilt Show
Need Inspiration?
Are you looking for quilt inspiration and advice? QuiltWeek, October 1-4, 2014, is sponsored by the American Quilter’s Society (AQS) and held at the Iowa Events Center, 730 Third Street, Des Moines, IA 50309. The quilt show hours are 9:00 am – 6:00 pm Wednesday-Friday and 9:00 am – 5:00 pm on Saturday. Check out the internationally known instructors and authors, live events, books, magazines, contests, workshops, patterns, fabric, vendors, and exhibits at www.quiltweek.com. AQS members receive various discounts; however, you don’t have to be an AQS member to attend. There’s something for everyone. It’s definitely worth the short drive to Des Moines.
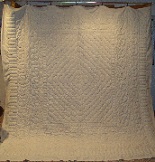
September 9, 2014 – Quilt Borders
You’ve probably heard the old adage, “Measure twice, cut once.” Well, when it comes to adding borders to a quilt, it’s important to measure at least three times before cutting the border strips of fabric.
Step One: Measure your quilt down the vertical center and along the two vertical side edges. Add these three measurement numbers and then divide the total by 3 to get an average. For example, if your quilt measures 60 inches down the vertical center, 60 1/2 inches down the left vertical edge and 60 1/4 inches down the right vertical edge, the total would be 180.75. Dividing the total of 180.75 by 3 gives an average of 60.25 inches.
Step Two: Cut the two side (edge) borders for your quilt to the width indicated in your pattern, but cut the length to the average measurement you found in Step One. Based on the example in Step One and assuming the pattern directions call for a 3 1/2 inch width, you would cut two fabric strips 3 1/2 inches by 60 1/4 inches. Fold the border strip in half and then mark the center. After you have determined the center of the quilt side (such as a seam, center of a block, etc.), align the centers of the quilt side and the border strip and pin in place (right sides together). Next pin the two ends of the border to the top and bottom of the quilt, making sure to align their edges. Finally, pin the entire border in place, easing it to fit the side. Repeat for the other side border.
Step Three: Press the side border seams open. Repeat Step One for the top and bottom borders. Measure along the quilt’s top edge, the horizontal center and the bottom edge. Determine the average of these three measurements and then repeat Step Two by cutting and attaching the top and bottom borders. Press the top and bottom border seams open.
Repeat these steps for each additional border.
Once all four borders are attached, check the measurements along the center and outer borders. You should find that the borders have now helped to square up the quilt. A squared quilt is pleasing to the eye, and it’s easier to work with on a long arm machine.
August 29, 2014 – Custom Quilts

If you are looking to enhance the design and character of your quilt, custom quilting may be the answer. The center of this Drunkard’s Path quilt was quilted using a floral circle design followed by an outline stitch for each half circle and square point of the Drunkard’s path design. Small straight stitch lines connected the edges of the two small inner borders. The first beige floral border was quilted with swirling floral circles like the center stencil. The dark purple border was quilted using a rolling “r”, with a double “r” design in the corners. (The rolling “r’s” mimicked the Drunkard’s Path piecing.) The middle beige border was quilted with a swirling leaf design, which reflected the floral design of the fabric. The light lavender border was quilted again with the rolling “r” design. The outer blue border was quilted with straight line stitches to the edge every two inches. The borders were separated with lines created from stitching in the ditch. All quilting was done with a purple variegated thread, which enhanced the stitching on the muted gray backing fabric. Polyester batting was used to give the design more loft.
August 6, 2014 – Team Spirit Quilts
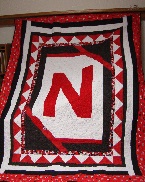

With the start of school just around the corner, it’s time to display your team spirit with pride. This quilt was made for someone’s wedding anniversary, who also happens to be a big Nebraska Husker fan. This queen-size quilt was quilted using the overall Shooting Stars© design by Sue Schmieden. These types of quilts make wonderful birthday, anniversary or Christmas gifts. They are also great raffle and/or fundraiser items.
July 22, 2014 – Round up and Fence in Your Stash
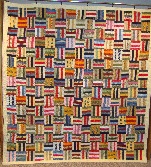
If you are looking for an idea to use up some of your fabric stash, you may want to consider a split rail fence design. The quilt shown was pieced using Nancy Mahoney’s “On the Rails” pattern, which can be found in the Winter 2013 edition of Fons & Porter’s Easy Quilts. The directions for this pattern called for red, white and blue material; however, this quilt utilized assorted stash pieces to give the quilt a more traditional scrappy look. Due to the busyness of the fabrics, the quilt was stitched using red thread with an all-over meander stitch. This pattern is simple, lends itself to a variety of appearances depending on colors used, and can easily be adjusted for additional sizes.